Generally service is one type of intermediate
for the communication between multiple different technologies, so here we make
one service which Is use to login valid user to android application.
Here process flow is Android app
user enter its username and password to its application then press login button , now on login button we call PHP
service which is connect the My SQL database and check the user table , and return response to the
android application.
For creating the Service in PHP we
have to make one page in PHP and also make table “tbl_User” for store user data
in My SQL, so by using service we compare the user data come from android app
with tbl_User and return result. For
create service follow below steps.
1.
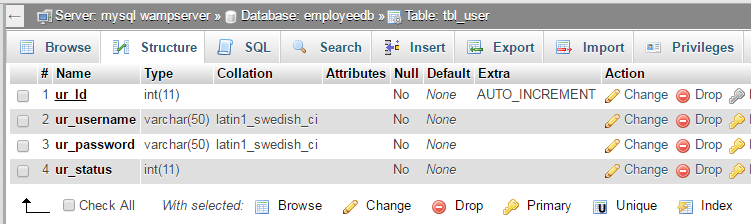
Make Table in MySQL for storing the user. Give its
name “tbl_User” this table contains UserName, Password etc…, for creating table
run below script.
CREATE TABLE IF NOT
EXISTS `tbl_user` (
`ur_Id` int(11) NOT NULL AUTO_INCREMENT,
`ur_username` varchar(50) NOT NULL,
`ur_password` varchar(50) NOT NULL,
`ur_status` int(11) NOT NULL,
PRIMARY KEY (`ur_Id`)
) ENGINE=InnoDB DEFAULT CHARSET=latin1 AUTO_INCREMENT=1 ;
By running above script it will create table
like below. here table contains Id, Username, Password, Status etc… columns
1.
Now insert some temporary data to this table, so for
insert data in temporary table I run below SQL script.
INSERT
INTO `tbl_user` (`ur_Id`, `ur_username`, `ur_password`, `ur_status`) VALUES
(1,
'nirav@gmail.com', 'nirav', 1),
(2,
'kapil@gmail.com', 'kapil', 1),
(3,
'arvind@gmail.com', 'arvind', 1);
After running below script you can
show table something like below.

1.
Now we make PHP service, so create one PHP file and
give its name “service_userlogin.php”
<?php
?>
-
Now we make MySQL server connection from the php file,
so pass server name, user name, password, database name etc…
$conn =
new mysqli('localhost', 'root', '');
mysqli_select_db($conn,
'EmployeeDB');
-
Here we pass server name as ‘localhost’, username as
‘root’ , password to be blank(’’), and we pass database name as ‘EmployeeDB’.
-
Now we get the parameter from the android
application so you get the parameter from the URL by using “GET” method. And check
is it contains any value or not.
if (isset($_GET[username]) &&
$_GET[username] != '' && isset($_GET['password']) &&
$_GET['password'] != '')
{
$email
= $_GET[username];
$password
= $_GET['password'];
}
-
We check the username and password comes from the
service URL and if its contains any data or not so first we store it in
variable as show in above code.
-
Here we make my SQL query for checking the user is
valid or not and run this query and check the output of query , if there is
any valid user is there then we pass its
userid in response of service.
-
In service response we pass total 3 parameters
o Status
o Message
o UserId
-
If user is valid then we pass Status=”Ok”, Message
=”Login successfully”, UserId=”whatever user id you find”.
-
If there is no any user exist in database with this
userid and password then we pass response with following parameter like
Status=”Not Ok” , Message=”Enter correct password” , UserId=”0”;
$getData = "SELECT
`ur_Id`,`ur_username`,`ur_password` FROM `tbl_user` WHERE `ur_username`='"
.$email."' and `ur_password`='".$password."'";
$result = mysqli_query($conn,$getData);
$userId="";
while( $r = mysqli_fetch_row($result))
{
$userId=$r[0];
}
if
($result->num_rows > 0 ){
$resp["status"]
= "1";
$resp["userid"]
= $userId;
$resp["message"]
= "Login successfully";
}else{
$resp["status"]
= "-2";
$resp["message"]
= "Enter correct username or password";
}
-
Here finally our main logic is finish but now we
have to make it set its “content-Type” parameter and pass it’s as JSON response.
header('content-type:
application/json');
$response["response"]=$resp;
echo
json_encode($response);
-
Now finally we close the MYSQL connection.
@mysqli_close($conn);
n Complete Code For PHP file
“service_userlogin.php”
<?php
$conn = new mysqli('localhost',
'root', '');
mysqli_select_db($conn, 'EmployeeDB');
if (isset($_GET[username]) &&
$_GET[username] != '' && isset($_GET['password']) &&
$_GET['password'] != '')
{
$email = $_GET[username];
$password
= $_GET['password'];
$getData
= "SELECT `ur_Id`,`ur_username`,`ur_password` FROM `tbl_user` WHERE
`ur_username`='" .$email."'
and
`ur_password`='".$password."'";
$result = mysqli_query($conn,$getData);
$userId="";
while( $r = mysqli_fetch_row($result))
{
$userId=$r[0];
}
if
($result->num_rows > 0 ){
$resp["status"]
= "1";
$resp["userid"]
= $userId;
$resp["message"]
= "Login successfully";
}else{
$resp["status"]
= "-2";
$resp["message"]
= "Enter correct username or password";
}
}else
{
$resp["status"]
= "-2";
$resp["message"] =
"Enter Correct username.";
}
header('content-type:
application/json');
$response["response"]=$resp;
echo json_encode($response);
@mysqli_close($conn);
?>
-
Now we run the php file in WAMP/XAMP server and pass
username, password as parameter in URL.
-
OUTPUT :
{"response":{"status":"1","userid":"1","message":"Login
successfully"}}

Thanks for reading my article; if you have any question regarding this
than you can ask me on comment section.
Adana
ReplyDeleteElazığ
Kayseri
Şırnak
Antep
F8N
düzce
ReplyDeletesakarya
tunceli
van
bayburt
S5İC
https://titandijital.com.tr/
ReplyDeletekars parça eşya taşıma
konya parça eşya taşıma
çankırı parça eşya taşıma
yalova parça eşya taşıma
WDF
maraş evden eve nakliyat
ReplyDeletemaraş evden eve nakliyat
izmir evden eve nakliyat
konya evden eve nakliyat
erzurum evden eve nakliyat
BUB
sakarya evden eve nakliyat
ReplyDeleteosmaniye evden eve nakliyat
aksaray evden eve nakliyat
çanakkale evden eve nakliyat
zonguldak evden eve nakliyat
AALV4
DB924
ReplyDeleteBursa Evden Eve Nakliyat
Yozgat Evden Eve Nakliyat
Gümüşhane Lojistik
Iğdır Parça Eşya Taşıma
Erzincan Evden Eve Nakliyat
052EA
ReplyDeleteBolu Lojistik
Denizli Parça Eşya Taşıma
Düzce Evden Eve Nakliyat
Hatay Parça Eşya Taşıma
Tokat Lojistik
07A95
ReplyDeleteDenizli Şehirler Arası Nakliyat
Ordu Şehir İçi Nakliyat
Tokat Lojistik
Ankara Asansör Tamiri
Kütahya Şehirler Arası Nakliyat
Aksaray Evden Eve Nakliyat
Antalya Rent A Car
Erzincan Parça Eşya Taşıma
Hatay Parça Eşya Taşıma
4E99C
ReplyDeleteorder peptides
Bayburt Evden Eve Nakliyat
oxandrolone anavar for sale
Kastamonu Evden Eve Nakliyat
sarms
Adıyaman Evden Eve Nakliyat
Yalova Evden Eve Nakliyat
order steroid cycles
Tekirdağ Fayans Ustası
83FF7
ReplyDeleteMardin Parça Eşya Taşıma
Çankırı Evden Eve Nakliyat
Osmaniye Şehir İçi Nakliyat
Bayburt Şehirler Arası Nakliyat
Karabük Evden Eve Nakliyat
Kırklareli Parça Eşya Taşıma
Bilecik Şehirler Arası Nakliyat
Niğde Evden Eve Nakliyat
Urfa Şehirler Arası Nakliyat
FBDE6
ReplyDeleteBitget Güvenilir mi
Sinop Parça Eşya Taşıma
Ardahan Şehir İçi Nakliyat
Çorum Şehirler Arası Nakliyat
Düzce Lojistik
Van Parça Eşya Taşıma
Batıkent Fayans Ustası
Ünye Çekici
Bitlis Şehirler Arası Nakliyat
C4093
ReplyDeleteÜnye Koltuk Kaplama
AAX Güvenilir mi
Sincan Fayans Ustası
Ağrı Lojistik
Azero Coin Hangi Borsada
Uşak Şehirler Arası Nakliyat
Çanakkale Şehir İçi Nakliyat
Antalya Rent A Car
Edirne Evden Eve Nakliyat
EB9D1
ReplyDeleteKonya Şehirler Arası Nakliyat
Karaman Şehir İçi Nakliyat
Giresun Şehirler Arası Nakliyat
Silivri Boya Ustası
Düzce Şehirler Arası Nakliyat
Kilis Şehir İçi Nakliyat
Bingöl Lojistik
Kilis Lojistik
Hamster Coin Hangi Borsada
090E2
ReplyDeleteorder steroids
Bitlis Evden Eve Nakliyat
Binance Güvenilir mi
Adıyaman Evden Eve Nakliyat
boldenone for sale
order parabolan
Çerkezköy Cam Balkon
Karabük Evden Eve Nakliyat
Coin Nedir
30D55
ReplyDeletebinance referans kodu
18E6D
ReplyDeleteŞırnak Mobil Sohbet Siteleri
yalova en iyi görüntülü sohbet uygulamaları
yozgat yabancı sohbet
bilecik ücretsiz sohbet sitesi
bursa yabancı görüntülü sohbet siteleri
çankırı sesli mobil sohbet
aksaray yabancı görüntülü sohbet siteleri
Urfa Seslı Sohbet Sıtelerı
Muğla Parasız Görüntülü Sohbet Uygulamaları
4F9B9
ReplyDeleteSohbet
Binance Hangi Ülkenin
Sohbet
Bitcoin Nasıl Kazanılır
Xcn Coin Hangi Borsada
Instagram Beğeni Hilesi
Discord Sunucu Üyesi Satın Al
Lunc Coin Hangi Borsada
Twitter Takipçi Satın Al
83A3E
ReplyDeleteOnlyfans Beğeni Hilesi
Sonm Coin Hangi Borsada
Likee App Takipçi Hilesi
Coin Madenciliği Siteleri
Parasız Görüntülü Sohbet
Discord Sunucu Üyesi Satın Al
Soundcloud Takipçi Satın Al
Görüntülü Sohbet
Chat Gpt Coin Hangi Borsada