If you are new to the raspberry Pi then first read below tutorials.

For Flashing/Blinking the Led on breadboard using Node JS
follow bellow steps.
· Required List of components
a). 1 - Raspberry Pi
device with 5 V power supply.
b). 1 - Bread Board
c). 1 - Male to Female
jumper cable
d).
1 - LED
1.
First connect the GPIO pin to the bread board as
shown in figure.
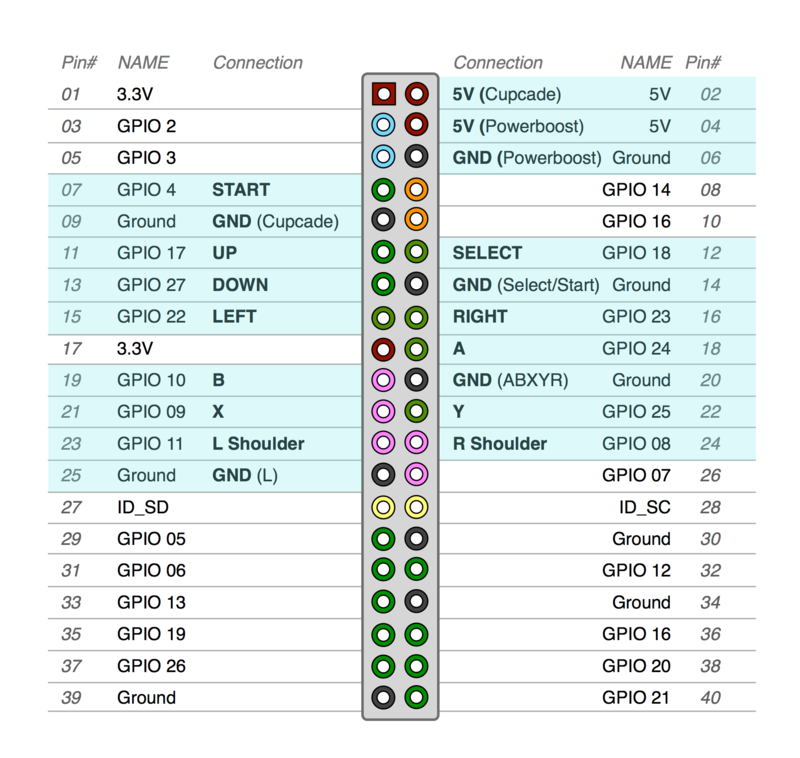
2.
Here we use the PIN Number: “ 4 “
(As per number 4(pin rank 7) , third from the top – left ). For get the output from the raspberry pi so connect eh jumper
wire from Raspberry PI GPIO pin “4” to bread
board as shown in image

3.
Now take LED and put it on bread board as show
in image.
Connect the Plus terminal of LED to the
Jumper cable (green cable in image) come from the GPIO Pin “4” as shown in
image

4.
Now take another jumper cable (black cable in
image) connect it the GPIO pin “Ground” (As per number 3(Pin rank 6) , third
from the top – right ). And other terminal of this wire to minus terminal of
the LED as shown in figure.

5.
Here for detecting the plus/minus terminal of
LED, bigger (toll) terminal of LED is Plus and Small (short) terminal of LED is
minus. Or you can define it by cutting side part of LED is Minus terminal.

6.
Now write the Node JS program for blink LED
every 1 second for the 1 minute.
Here we use “Onoff ” module for the access
the GPIO Pin of raspberry pi device.
-----------------------------------------------------------------------------------------------
var Gpio = require('onoff').Gpio,
led = new Gpio(4,
'out');
var iv = setInterval(function(){
led.writeSync(led.readSync()
=== 0 ? 1 : 0)
}, 1000);
// Stop blinking the LED and turn it off after 5 seconds.
setTimeout(function() {
clearInterval(iv);
// Stop blinking
led.writeSync(0); // Turn LED
off.
led.unexport(); // Unexport
GPIO and free resources
}, 60000);
7.
Now Run the Program Show the Output as shown
below.

Now you enjoy with your raspberry PI, if you like my
tutorial then comment on this. And if you have any query the write it to
comment box or mail me on n005nirav@gmail.com
Great Article
ReplyDeleteInternet of Things Final Year Project
Final Year Project Centers in Chennai
perde modelleri
ReplyDeleteSms Onay
mobil ödeme bozdurma
nft nasıl alınır
Ankara Evden Eve Nakliyat
trafik sigortası
Dedektör
kurma websitesi
aşk romanları
smm panel
ReplyDeleteSmm panel
İs ilanlari
instagram takipçi satın al
Hırdavatçı Burada
HTTPS://WWW.BEYAZESYATEKNİKSERVİSİ.COM.TR
SERVİS
Tiktok Hile İndir
Good content. You write beautiful things.
ReplyDeletesportsbet
mrbahis
taksi
sportsbet
korsan taksi
hacklink
vbet
vbet
hacklink
Good text Write good content success. Thank you
ReplyDeletetipobet
kibris bahis siteleri
slot siteleri
kralbet
poker siteleri
betmatik
betpark
bonus veren siteler
yurtdışı kargo
ReplyDeleteresimli magnet
instagram takipçi satın al
yurtdışı kargo
sms onay
dijital kartvizit
dijital kartvizit
https://nobetci-eczane.org/
J5K1O
salt likit
ReplyDeletesalt likit
8XOS
https://saglamproxy.com
ReplyDeletemetin2 proxy
proxy satın al
knight online proxy
mobil proxy satın al
İ5Z2
görüntülüshow
ReplyDeleteücretli show
85ATF